

Doors, Books and the Art of Travel
If I had to show someone around Barcelona, I'd probably bring them to the area with the most crappy old doors. There's little more compelling to me than imagining what goes on behind an ancient, dirty, cracked, graffiti-covered door...
I've always been interested in the details of a place, not in the broad strokes; not in the great wonders of a city, but in its little quirks and dirty corners. Those are things I can take wonder in. I can begin to feel like those details and oddities are part of my story. It's the unseen, untold goings-on of the place that I can get behind with the full force of my imagination. That's how you get attached to a place. It's the way I feel about a city in which a book that I really loved was set for instance, even if I've never been there. I suddenly feel that I know something of the underlying character of the place and its inhabitants. And that has very little to do with its cathedrals and museums. It may be no coincidence that so many people love both the book 'The Shadow of the Wind' and the city of Barcelona.
The Art of Travel
When I was a teenager, I read the book 'The Art of Travel' by Alain De Botton. I wouldn't generally rate it as one of my favourite books but perhaps I should because I know that it has had a profound effect on my life. I remember frighteningly few details of the book but I do remember one passage very clearly and I think it encapsulates the meaning of the book, at least the meaning that I understood. The author describes - and I'm paraphrasing dramatically - attempting to draw the window of a crappy hotel room that he has just arrived at. He can't draw. He doesn't even really want to draw the thing but he read that drawing stuff while travelling was something he should do so he's trying. The window is essentially the only thing of interest in this hotel room and even that is not terribly interesting but in spite of this, he draws it. His sketch turns out to be worthless, as expected but he realises the point of the exercise. He has acquired a detailed understanding of the room and the window. He has been forced to observe something, in minute detail, that he would never have otherwise paid attention to. He notes the peeling paint where the window rubs against the frame as it's opened, the colour of previous paint jobs peeking through, the spider webs in the corner, the direction and hue of the sun at that moment, the distant spire he can just about see through the window between the buildings opposite, he wonders about the architects choice in putting the window in that spot etc etc. The point is he feels connected to the place, and interested in it just by virtue of observing the details.
Since reading 'The Art of Travel' and since doing my own travelling, I have very much embraced this point of view. I feel like it is easy to burn yourself out looking up places to visit, travelling to them, walking around them for hours. While I still do that occasionally, I am usually much happier to spend some time in the neighbourhood where I'm staying, even if it is a bit of a sh*thole. There's lots to see. Lot's of amazing and interesting things everywhere, not only in the places that have 50 Yelp reviews or the government has decided is worthy of building a visitor centre around. Sure there's things in my own garden that I've never seen before, if I look a little closer.
Barcelona Doors
In my most recent travels, I was fascinated by Barcelona's doors. In the the three months I spent there last year, I was constantly charmed by them. I was interested in the huge, beautifully crafted, wooden doors at first, but then I became fascinated with all the doors and the artwork that covers most of them. In fact, I began to love the old, patched up, dirty ones the best. These are the ones that had a story. There's something so compelling about seeing someone go through one of these doors. What's behind there? What does this person do? How did they end up living behind that door? If I had to show someone around Barcelona, I'd probably take them to the area with the most crappy old doors.
It's interesting to me that almost every door in Barcelona has some graffiti but the buildings themselves are generally graffiti-free. There is a now established tradition amongst shop owners of commissioning street art for the security shutters that are so common there but I would guess that at least half, probably more of the door art is unasked for and unwanted. It begs the question, if it's illegal anyway, then why restrict yourself to doors. I've asked around about this but it's unanswered. Neither do I know if the practice of painting doors follows on from the commissioning of artworks or if doors were being used as canvases anyway so shop-owners joined them instead of fighting them.
Most Prolific Barcelona Street Artists
When you spend a couple of months staring at graffiti, you begin to get to know some of the most common artists. And the prize for most prolific Barcelona graffiti artist goes to......ICEPOP GUY! Those things are everywhere! Turns out his name is Onegizer Konair and his art is varied and interesting and always recognisable. Props to you. Check out this interview with him or hit him up on twitter @konair.
Unknown artists
These two artists are unidentified but I noticed them a lot. I wasn't particularly impressed with their skill but they're prolific and I guess everyone starts out with quick and dirty pieces all over the city. Maybe someday they'll be as impressive as these well-known barcelona-based street artists: El Xupet Negre, El Pez, El Mano/Nami, Kenor, H101, Btoy, Chanoir and Zosen & Mina. Check them all out and while you're at it, watch this great little documentary about Barcelona street art.
Is Expensive Swedish Linseed Oil Really Worth It?
I use linseed oil as a preservative to treat my wooden kitchenware. Initially, I thought one cold-pressed linseed oil couldn't be that different from another, right? Wrong. Read on for a comparison between a cheap cold-pressed linseed oil and an expensive one from Sweden.
Treating Wooden Spoons with Linseed Oil
I use linseed oil as a preservative to treat my wooden kitchenware. Initially, I thought one cold-pressed linseed oil couldn't be that different from another. If it's cold-pressed, it's cold-pressed. That's all I need to know, right? Wrong. Read on for some background on linseed oil production and a comparison between a cheap cold-pressed linseed oil and an expensive one from Sweden.
Linseed Oil Manufacturing
Swedish linseed oil manufacturers and various other people claim that the quality and clarity of the oil is dependent on the amount of UV light to which the seeds are exposed during ripening, meaning that flax plants grown in higher latitudes produce better oil. I admit I have not done enough reading to confirm this to be scientific fact but it is congruous with my meagre observations thus far.
This small cold press is very similar to the large screw presses used in industrial manufacturing.
It is also worth noting that the extraction process is very variable and it is probably not possible to determine the exact method from the label alone. The term 'cold-pressed' means that no heat is added during the extraction process. Less heat results in better quality oil. A significant amount of heat is generated by the pressing procedure itself. Some producers take extra steps to cool the system during extraction to keep the temperature low, thereby preserving the flavour and the fatty acids in the oil. The oil needs to be cleaned from the sludge and sterilised to obtain the final product, adding yet more room for variation.
Comparing Cheap Oil with Expensive Oil
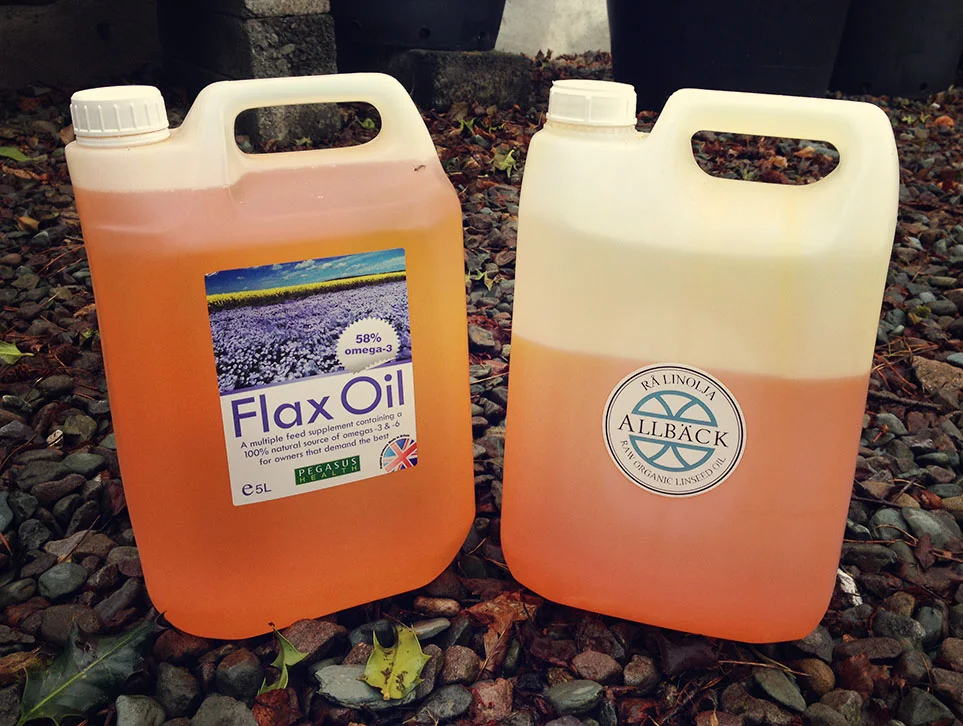
When I started treating my wooden spoons with linseed oil, I bought a 1-gallon drum of Pegasus Health, food-grade, cold-pressed flaxseed oil for €20 (it turns out flaxseed oil is basically the food-industry's term for linseed oil: they're the same thing). The particular oil is British and is actually intended as a food supplement for horses. This oil worked satisfactorily well as a wood preservative for some time. It has, as I expected, a very slightly fishy, but not unpleasant aroma. In fact, some customers commented on the pleasantness of it (everyone seems to perceive the odour differently). However, I began to read about some folks choosing to buy expensive, organic linseed oil from Sweden and claiming that it was better for some reason so I tried it for myself.

Cheap Linseed Oil Versus Expensive Linseed Oil
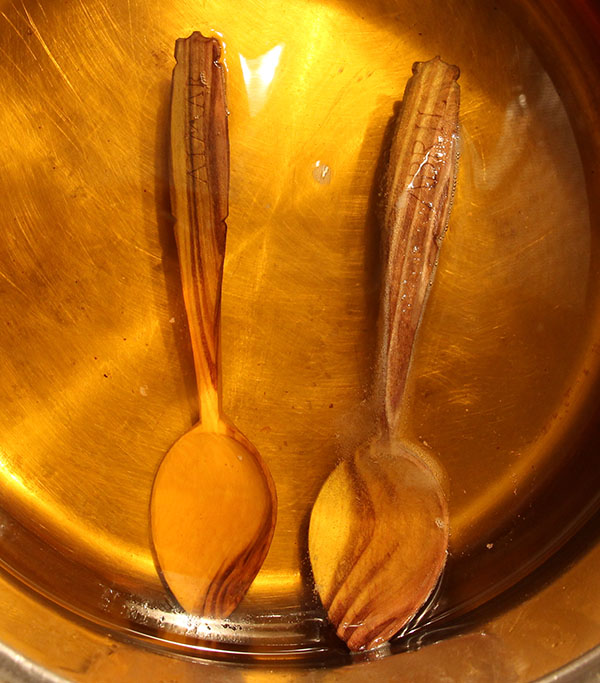
I bought 1 gallon of Ållback, organic, cold-pressed linseed oil, produced in Sweden, for €87. In appearance, it is similar, but on closer inspection, it is noticeably clearer and has a more golden colour than the cheaper oil, which is a little turbid and has a slightly orange hue. When I removed the spoons from the hot oil after soaking, they had a positively mouth-watering, nutty aroma, which made me hungry. This, for me, is the most noticeable and pleasing difference between the two products and I think it's probably indicative of the high quality and purity of the oil generally. I have a tentative sense that the Swedish oil also dries somewhat quicker but I have not done any controlled experiments to confirm this.
In short, yes, expensive linseed oil from Sweden is better than the cheap stuff. And yes, in my opinion, it is worth the extra cash. Since flax grows well in the Irish/UK climate, it is a bit of a shame to buy it from Sweden, but until I find an Irish or British producer of high quality oil, I will be buying mine from Sweden. If anyone out there has a suggestion for a supplier, please let me know!
29/4/15 Edit - http://thelinseedfarm.co.uk has been suggested to me as a good UK supplier of linseed oil but I have not tried it yet.
7/4/18 Edit - Pre-oxidised linseed oils (like this one) seem to be more readily available now and they have the significant advantage of drying much quicker than the oils in this article which are not pre-oxidised (about 3 days versus maybe 6 months)
19/2/21 Edit - https://www.adorafarm.com is a good Irish producer. You can buy directly from their website but they’re mainly focussed on the food supplement market I think. So the quantities are generally small and the price point a little higher than bulk options. You don’t need much though.
Making a Deer Antler Knife Handle
Buying a blade without a handle is cheaper and it gives you the opportunity to design a handle to suit your own carving style. I decided to use a deer antler I was given to make really characterful handles. This is how I did it.
Buying a blade without a handle is cheaper than getting a handled one and it gives you the opportunity to design a handle to suit your own carving style or just to add character to your knife. As well as that, many great small-scale blacksmiths just don't sell them with handles. I decided to use a deer antler I was kindly given to make really characterful handles for some blades I got recently from Nic Westermann and Svante Djärve. This is how I did it!
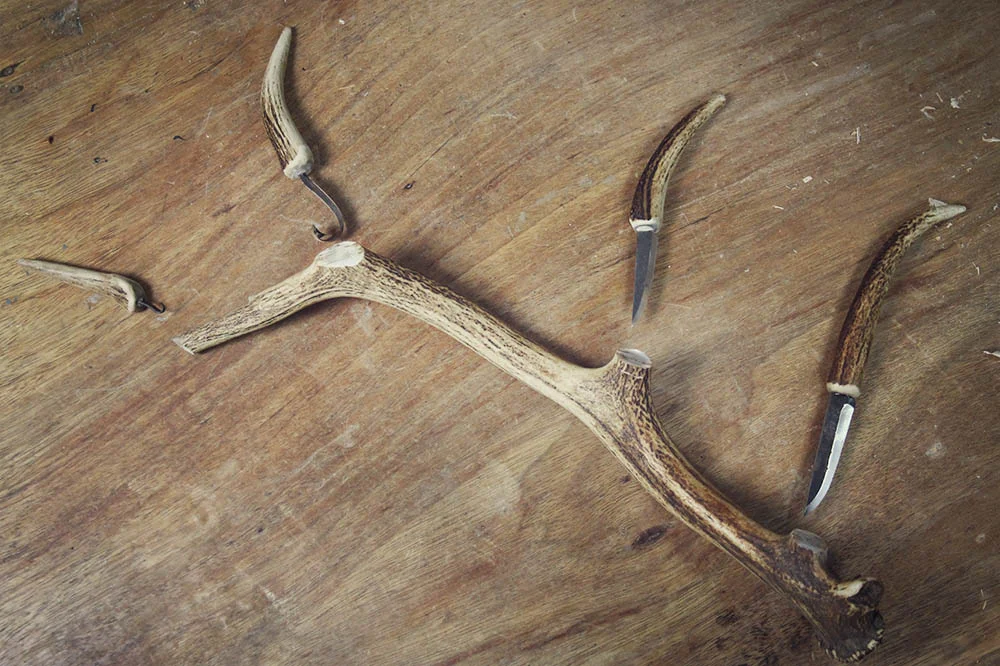
Nic Westermann 'laminated sloyd blade', mounted in a deer antler handle
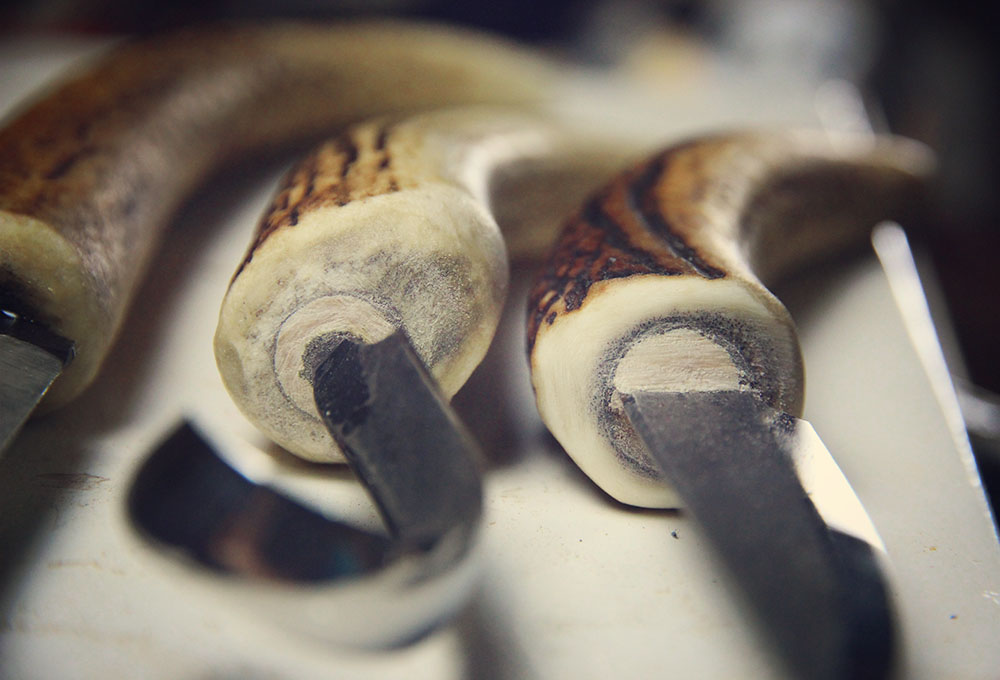
First I cut off the tines off the antler, as close as possible to the main stem, with a hacksaw. You want to make the most of the straighter part of the tine which is usually the part closest to it's base. Incidentally, you will discover what burning antler smells like. You can add that to the list of useless but kind-of-interesting things you know! The centre of the antler is porous, like the spongy centre of bones, but the outside layer is really incredibly hard. I suppose it is adapted as a weapon for bashing repeatedly against other antlers so it would have to be tough. The main part of the antler is a bit too large for a knife handle but maybe I'll use it for a parang or something later.
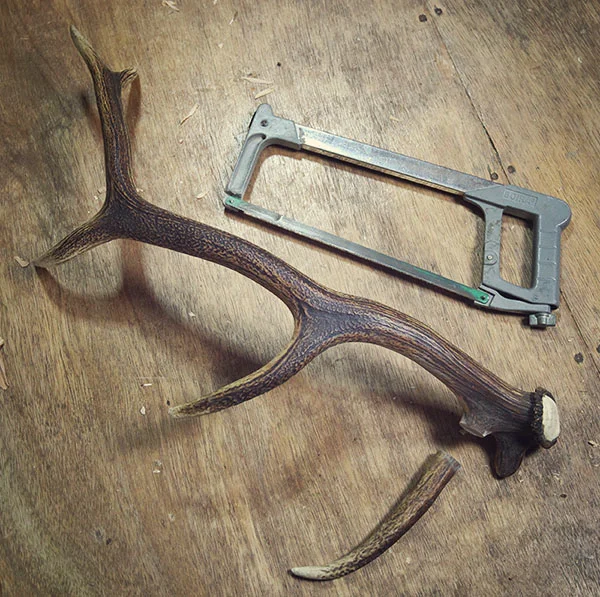
Cutting the tines off with a hacksaw

Anatomy of an Antler
Next thing to do is bevel the edge where the handle will meet the knife. You don't have to do this but it makes the knife more comfortable to use. You can also do this later but it's much more difficult to do once the knife has been mounted. I clamped the handle in the vice (wrapped in leather to avoid damage) and created most of the bevel with the hacksaw. It can then be rounded with sand paper. I did try bevelling it with a knife before I realised quite how hard it is. I'll save you the bother of resharpening your knife by advising against that.
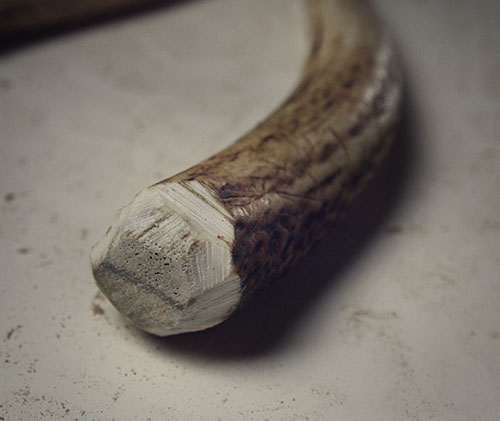
Bevelling the edge of the handle with a hacksaw.
At this point, I also tried the feel of each handle in my hand and decided how the blade would be orientated in the handle. This will depend on the curve of the tine and what type of grips you will use with that particular blade. Generally, I would recommend that you orientate the handle so that it curves downwards, towards the sharp edge of the knife, as in the photos. I marked the orientation I decided upon in pencil here for later reference.
When you buy a blade without a handle, you'll notice that the tang (the bit that extends into the handle) comes in different shapes and sizes. Most are flat but some are round. I happened to have blades with both. Round tangs are much easier to mount because you can drill a hole the exact diameter of the tang and just stick it in. A flat tang is a little more difficult. In wood, you can sometimes just drill a slightly undersized hole and force the flat tang into it, using a strong glue like epoxy resin. This works fine for crook knives for instance, where the strength is not critical. Otherwise, you can fit the tang into a slot in a dowel and then mount the round dowel in the handle. Nic Westermann actually provides a slotted dowel with each knife he sells which makes life easier. For an easy way to make your own dowels, have a look at this post.
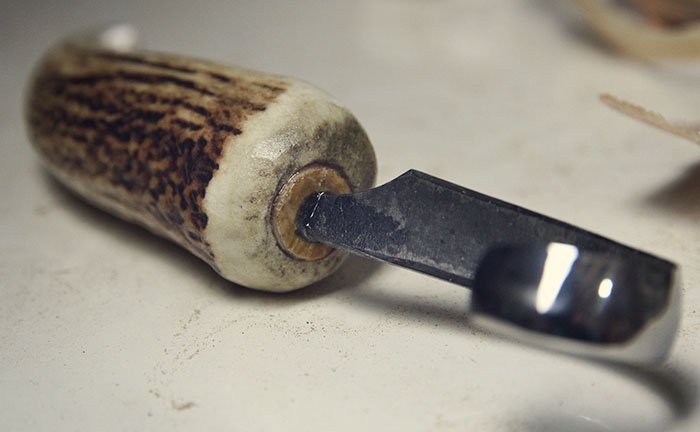
Even where the blade had a round tang, I wasn't sure it was a good idea to mount directly into the spongy material in the centre of the antler. I decided it was best to mount the knife within a dowel because I would be able to use a larger drill bit and drill out the weaker spongy material altogether.
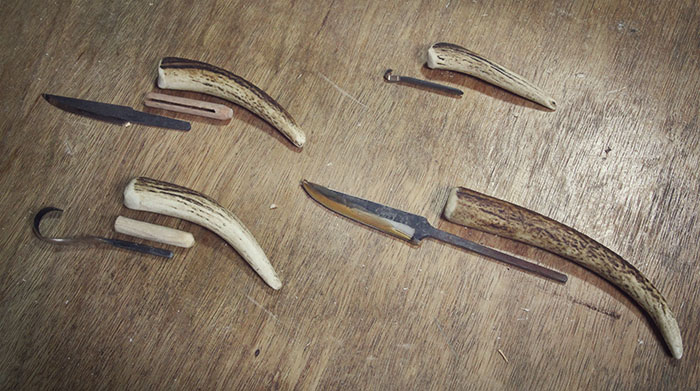
Orientating the blades within their handles. The large blade is from Svante Djärv. The others are from Nic Westermann.
Try to use a long drill bit to drill the hole if possible because this helps with lining up. It's fairly easy to go off centre or too deep in the curved handles. A hole the exact size of the dowel will give a snug fit without having to really bash the tang in.
Before you begin mounting the blade, make sure to wrap it up in a good many layers of masking tape to protect yourself and the blade's edge. Even so, take caution when driving it in! I used a two-part epoxy resin to glue the tang into the dowel and then the dowel, with the blade, into the hole. I did these things in one step. I'd recommend a slow-drying glue to give you some time. I chose to grip the blade in the vice (with leather) and drive the handle onto it. Leave the dowel long so that it protrudes from the handle slightly. This can be neatly trimmed and sanded flush later. If the tang has a notch near base of the blade, as Nic's do, try to make sure this ends up bedded into the handle to give extra resistance to torsional movement.
The dowel is left slightly long so that it protrudes slightly, to be trimmed later when the glue has dried.
The dowels are neatly trimmed and sanded flush.
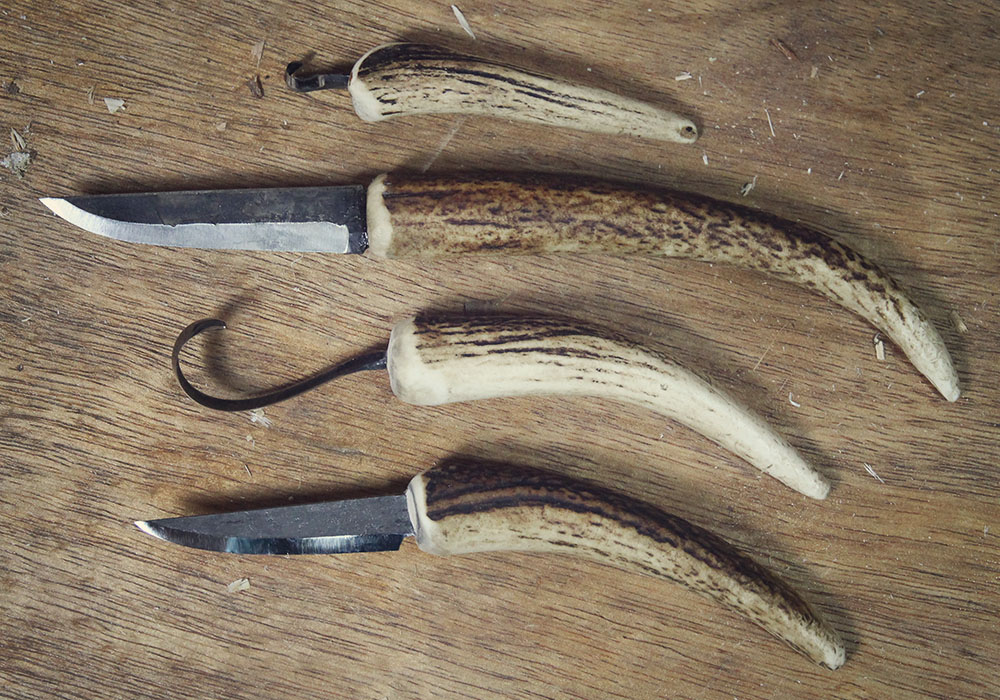

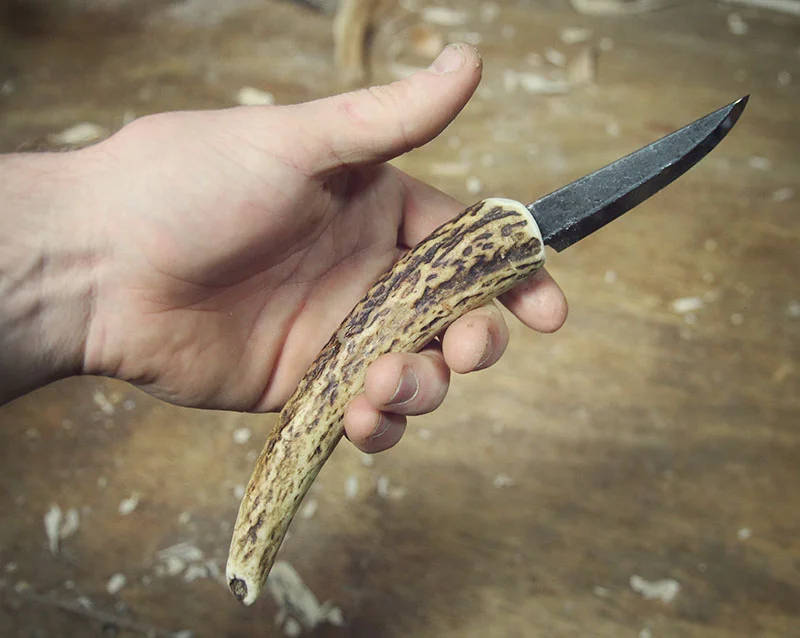
Nic Westermann's tiny crook knife with its brand new antler handle. I bevelled the edge of the handle even more later to improve comfort.
It's a satisfying thing to make your own knife handles. And I recommend doing it with all your knives once you've been carving for a while and you know what you like in a handle. Now, as I sit and carve, I can feel the deep scratches and scars in the handle and I imagine the stag to whom it belonged, battling another young stag on a hillside in Donegal. That's character.
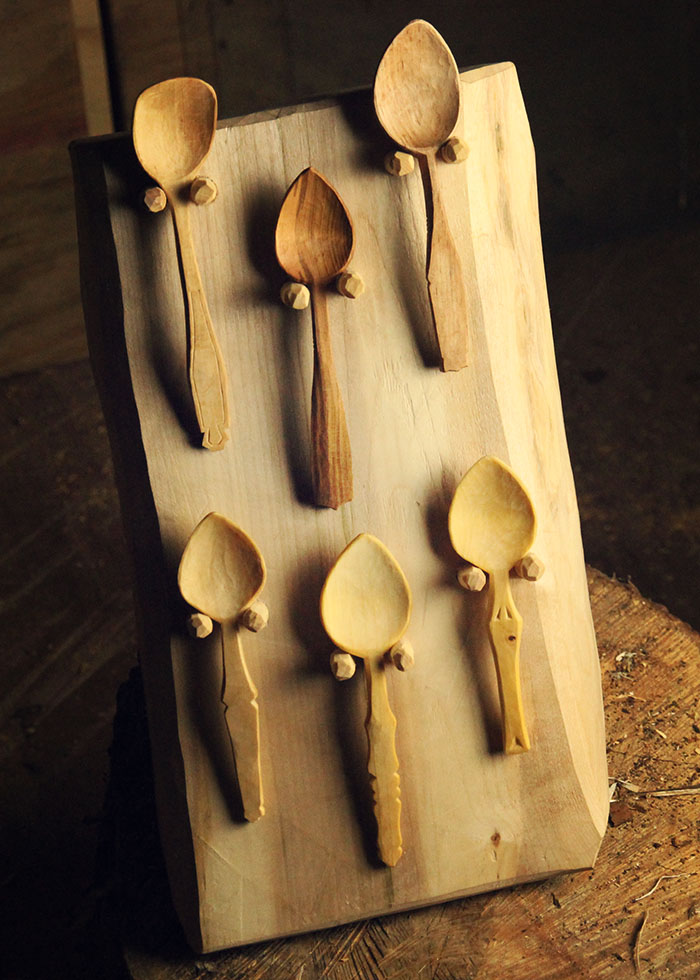
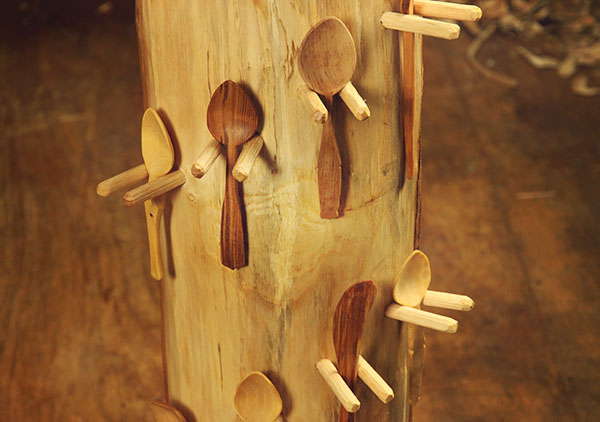
Ideas for a Rustic Display Stand
I needed a way to display my spoons that was rustic and simple to match the character of my handmade spoons. This is what I came up with. Find out how I went about making it...
I needed a way to display my spoons for a recent pop-up shop venture with some other local makers. I didn't want to use dimensioned timber. I wanted to use roundwood and green woodworking techniques so that the stand would match the character and spirit of my handmade spoons. This is what I came up with. I thought I would share the idea since it could be easily adapted to display many types of products in a satisfyingly simple and rustic way.

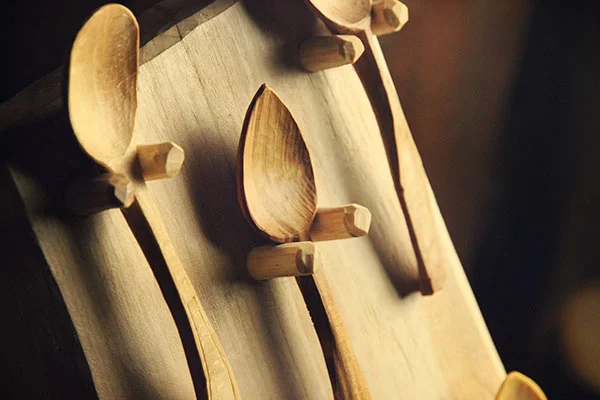
Firstly, I made some 1/2" ash pegs using a wonderfully simple and effective tool called a tine cutter, traditionally used to make the tines (prongs) of wooden hay rakes (the one I have is made by Ray Iles). Making the pegs is a very satisfying process! I took a short length of very straight ash, wrapped a bungee cord around it and started splitting it with the froe. First, I split it in half, through the pith, and then again at right angles to make four equal quarters. The bungee conveniently held the pieces together as I continued splitting in a grid pattern to produce a bundle of square pegs with sides slightly longer than 1/2". I didn't bother to mark it out. It was easy enough to do by eye.


I positioned the tine cutter over a hole in the bench to allow the round pegs to fall through. As each peg is driven through with a wooden maul, it pushes the preceding one, now a perfect 1/2" round peg, into the bucket underneath with a delightful 'ping'! As unsatisfying as it sounds, driving a square peg into a round hole can be just the opposite! I wouldn't recommend using seasoned wood for this because your tine cutter will rapidly become blunt and need resharpening. When I had enough pegs, I left them near the fireplace to dry thoroughly. If the pegs are driven into a mortice while green, they will shrink and become loose later. Since ash has a low water content to begin with, drying is fairly rapid.

The tine cutter in action.

A bunch of lovely ash pegs.

For the base, I simply used an ash log, approximately 7" in diameter. This may seem like a waste of wood but I found that it looks good and the sheer mass of it makes for a stable stand. You could just as easily use some knotty wood that has little value for other purposes. I decided to strip the bark from one side with a drawknife but the bark could be left on if desired. I took some time to try out a couple of peg layouts in pencil before drilling. When I had chosen my layout (sort of a partial helix), I marked the positions of the pegs with an awl and shaved off the pencil marks with the drawknife.

Shaving the bark off one side of the ash log with a drawknife.

Laying out the peg positions in pencil.
I drilled the holes with a brace and bit and drove the dry pegs into the holes. Bear in mind that, depending on the water content of the wood from which the pegs were made, they may have shrunk from their original size. You shouldn't need to use glue if the peg is dry and the hole is the correct size. You will find that they are extremely difficult to get out again if, say you use a peg that is too short by accident (as I did!).
After drilling the first hole, I would suggest driving a peg into it, and using it as a guide to drill the next hole. This is a good way to make sure the angle of the holes is consistent. Compared with an electric drill, the extra length of a brace and bit and the ability to make minor adjustments as you drill makes lining up holes a lot easier. You can sight along the length of the brace as I am doing in the picture below.
After inserting all the pegs, I cut them to the same length. In this case, I left them long enough to hang multiple spoons in each position if desired. I rounded the ends of the pegs with a knife to give them a faceted finish, similar the spoons themselves.

Sighting along the brace to line up the hole, using the previous peg as a guide

Cutting the pegs to length
Lastly, I made a slot in the top of the stand for my business cards by making two parallel saw cuts into the end grain and chiselling out the wood in between. I thought this rather an elegant and simple little addition.

A beautifully simple way to display your business cards
To finish, I rubbed a linseed oil-beeswax mixture into all the exposed wood. I also added three legs to give some extra stability (see photo at the top) but I later removed them because I think, provided the bottom surface is square and flat, it has enough stability as it is and looks a little more elegant.
This design is very quick and easy to make and can be easily adapted other types of stands and products. I have made several other variations on this idea using the same basic principles. This particular model suffers from a slight design flaw which means that the spoons are quite easy to knock off the stand. In later models, I have found that slightly squarer pegs and a slightly reclined surface (as in the smaller stand depicted below) makes for more stable spoon mounting. Some ideas for you anyway.

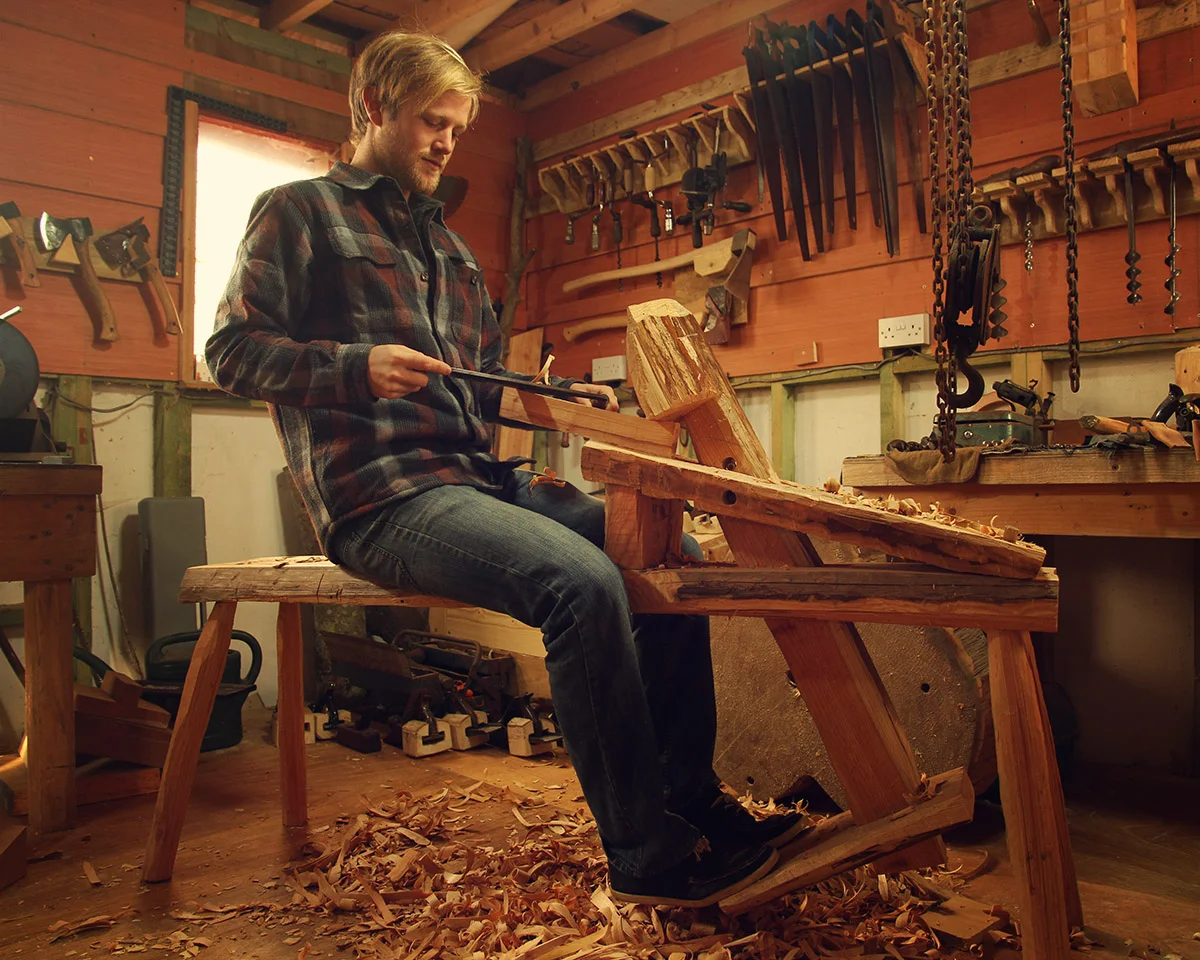
What Is Green Woodworking?
To explain it simply, green woodworking is a craft in which 'green' or unseasoned wood is worked into finished items using hand tools. This explanation however, may give you the impression that the only difference between conventional woodworking and green woodworking it that the wood is unseasoned. In reality, it involves a whole range of tools and principles that have virtually been eliminated from modern woodworking by the ubiquitousness and affordability of dimensioned and kiln-dried timber. Rather than being an obsolete or primitive form of work, to be recorded for posterity only, I would argue that the old techniques of processing trees manually, by riving and hewing them while 'green', pay much greater attention to the nature of the wood, allowing it to be worked with less effort and actually preserving its inherent strength and flexibility in the finished product...
To explain it simply, green woodworking is a craft in which 'green' or unseasoned wood is worked into finished items using hand tools. This explanation however, may give you the impression that the only difference between conventional woodworking and green woodworking it that the wood is unseasoned. In reality, it involves a whole range of tools and principles that have virtually been eliminated from modern woodworking by the ubiquitousness and affordability of dimensioned and kiln-dried timber. Rather than being an obsolete or primitive form of work, to be recorded for posterity only, I would argue that the old techniques of processing trees manually, by riving and hewing them while 'green', pay much greater attention to the nature of the wood, allowing it to be worked with less effort and actually preserving its inherent strength and flexibility in the finished product.
Riving/Cleaving
Riving is the process of splitting wood along its length by driving an axe or wedge between the wood fibres and forcing them apart. This is a very efficient process and, crucially, the split follows the flow of the grain exactly. None of the wood fibres, which run along its length, are severed. This maximises the strength in the wood, allowing the craftsman to make very thin and light objects that are very strong. It also means that natural bends in the wood can be not only tolerated, but used to advantage, in the crank of a spoon handle or the bend of a chair leg for example. The froe is a traditional riving tool that is now rarely seen.
Hewing
Hewing is the process of flattening a timber face using a side axe, broad axe or foot adze. It comes after riving in the sequence of actions and, if the end goal is flat and square lumber, it’s the first step in the truing process, later involving a series of hand planes. Most of my work does not require flat or square boards however. This is the process that would have been used to produce large timber framing beams before widespread timber milling. The curved marks of the broad axe are often visible on timbers of older buildings.
Shaving
The shaving horse, in Ireland more commonly known as the cooper’s mare, is a foot-operated vice of ancient design. It consists of a bench, a stage and a foot-operated lever arm that clamps your work to the stage. The work can be rapidly repositioned and re-clamped, making it a particularly effective tool for shaping cylindrical objects like chair legs, axe hafts or rake stales (handles). Traditionally, these stood on three legs, in order to make them stable on the uneven woodland floor where the work was often carried out.
The shaving horse is used in combination with the drawknife, a two-handled knife that is drawn towards the user. The drawknife works well for both fine work and heavy stock removal. It is often used to perform a task that is half way between shaving and cleaving (I like the term ‘sheaving’, coined by Mike Abbot) that allows thin layers of wood to be removed quickly while keeping the long-grain fibres of the wood completely intact. This method has been developed to a fine art by the wonderful Windsor chair maker Curtis Buchanan. I would recommend checking out his free instructional videos.
Pole Lathe Turning
The pole lathe is another foot-powered device of extremely ancient origin. It is a reciprocal lathe, meaning that the wood turns in both directions, alternately. A foot pedal powers the turning motion. The wood is only cut as the piece turns towards the user, resulting in a very rhythmical sequence, applying the tool's edge on the downstroke of the pedal only. The term 'bodger', originating in High Wycombe in Buckinghamshire, was used for an itinerant woodworker who worked in the woods of, turning component parts of chairs to be sold to chair making workshops. On a pole lathe, spindle turning is done using similar tools to those used by modern turners but bowl turning is usually done with hook tools that are extremely ancient and uncommon now. Bowls turned on a pole lathe have a very characteristic quality, unlike that of bowls turned using a power lathe. Robin Wood is probably the most accomplished contemporary pole lathe bowl turner and a great person to check out if you're interested.
Properties of 'Green' Wood
Wood is softer and much easier to work when green. The work is less taxing on the body and the tools keep their edge for longer. If my wood dries out too much, it becomes firewood to me because the wood becomes so much harder as it dries that the extra effort is no longer worth it. Wood generally dries very slowly in ambient air. Drying can be slowed even more by sealing the exposed end grain where most of the moisture escapes. Before controlled kiln drying came about, fully seasoned wood, especially thick slabs, would have been expensive and hard to come by. Working with unseasoned wood was commonplace. The term 'green woodworking' only came into common usage recently (it was invented by Jennie Alexander in the 70s and popularised by Mike Abbot in his first book 'Green Woodwork - Working wood the natural way').
Another very important feature of green wood is that it shrinks as it dries. It is a popular myth that wood cannot be worked without seasoning. It simply requires knowledge of how the wood will behave over time and in fact, this behaviour is quite predictable (I plan to write a detailed post about wood shrinkage at some point so brace yourself for that). You will need to embrace the fact that your bowl or chair leg will not turn out to be perfectly round but slightly oval. If the piece must be round, it can be reshaped slightly when fully dry. The danger of checking (formation of cracks to relieve tension that has built up in the wood during shrinkage) can be largely eliminated when the properties of wood are understood.
Shrink Joints
The shrinkage of the wood can be used to one’s advantage. Green wood chair makers combine seasoned components, made ahead of time, with unseasoned components to create very tight, glue-free joints. A mortise in a green chair leg will shrink tightly around the dry tenon of the stretcher to create a joint that is virtually impossible to separate.
Pure Satisfaction
On a personal note, I enjoy the lack of separation between me and the wood conversion process. I am able to literally make things out of trees: I control the whole process from start to finish. It is very much less satisfying to go down to the timber yard and buy dimensioned lumber from some unknown source. Knowing where the tree stood also adds an extra element of depth to every piece, which is something that is hard to describe but its something I love. When I collect a windblown tree from somebody's garden, I always try to make something from its wood for the tree's former owner.
In conclusion, green woodworking has been experiencing somewhat of a revival in recent years and I'm confident that the value of understanding these traditional woodworking principles will never be forgotten.
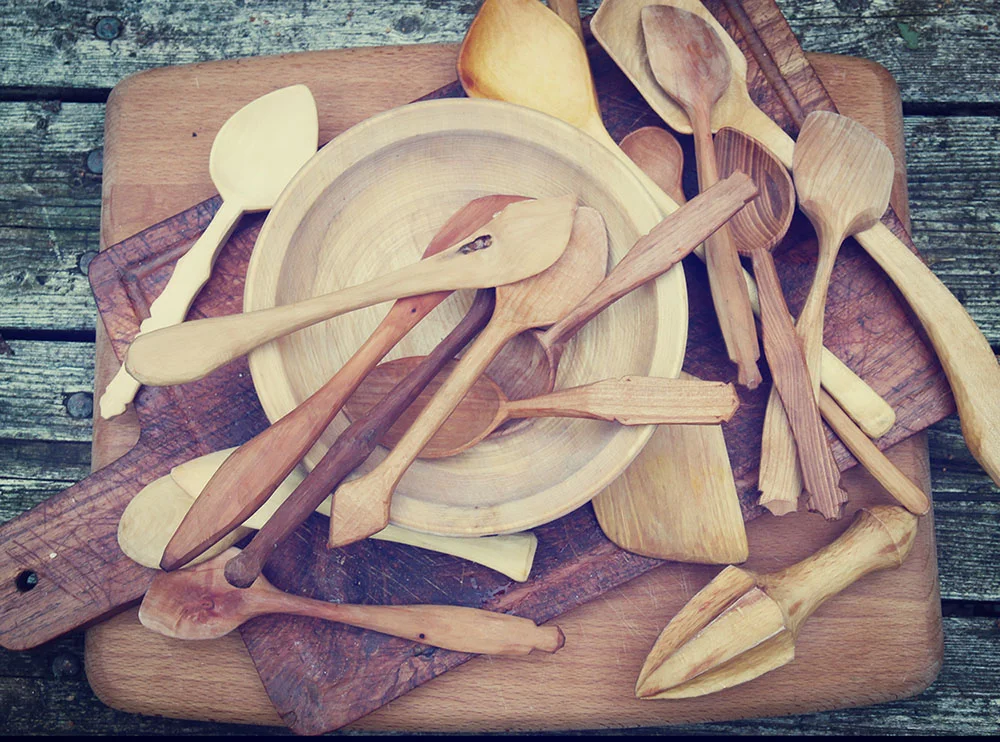
Are wooden spoons hygienic? How the US Government was proven wrong!
This is a question I get asked a lot. And even when it is not said, I sometimes get the feeling that it's what's going through a persons mind when they look at my wooden eating spoons, at a craft fair say. While I have always instinctually thought that yes, they are just as hygienic as steel or plastic, this very question has been addressed by actual scientists with PhDs and Professorships and everything. How convenient.
This is a question I get asked a lot. And even when it is not said, I sometimes get the feeling that it's what's going through a persons mind when they look at my wooden eating spoons, at a craft fair say. While I have always instinctually thought that yes, they are just as hygienic as steel or plastic, this very question has been addressed by actual scientists with PhDs and Professorships and everything. How convenient.
The interesting thing about this study is that it was commissioned by the U.S. Department of Agriculture when it realised that it had no evidence to support its official recommendation that plastic chopping boards be used instead of wooden ones in American home kitchens. Part of its original purpose was to see if there was a way to clean wooden chopping boards that would make them almost as hygienic as plastic boards. Not only did it not confirm their presumption that plastic was more hygienic, it showed that they were completely and totally wrong.
Dr Dean O. Cliver, Professor of Food Safety at the University of California carried out a comparison of bacterial growth on wooden versus plastic chopping boards (read the full report). He concluded that wooden surfaces were resistant to bacterial growth and were much more hygienic than plastic surfaces, especially with use:
(Disease bacteria)... were not recoverable from wooden surfaces in a short time after they were applied, unless very large numbers were used. New plastic surfaces allowed the bacteria to persist, but were easily cleaned and disinfected. However, wooden boards that had been used and had many knife cuts acted almost the same as new wood, whereas plastic surfaces that were knife-scarred were impossible to clean and disinfect manually
From my perspective, having studied ecology and the cellular structure of wood, this makes perfect sense. Wood is made up of biological cells. It has evolved to resist bacterial and fungal growth and therefore rot. The heartwood of living trees is actually dead but the structure of the cells still imparts resistance which plays an important role in keeping trees from falling over! Also, plastic is commonly used in biological wastewater treatment systems as a substrate for microbes because it just happens to be the perfect thing for them to grow on.
So there you have it: Yes, wooden spoons (and chopping boards) are hygienic!
What Is Man
I must admit that it is a little daunting to put your own words out there. Therefore, I believe I am going to cop out somewhat by introducing someone else's words. And very beautiful words they are. Enjoy
Whilst I am glad to make the switch from long-time 'lurker' to internet contributor, I must admit that it is a little daunting to put your own words out there. Therefore, I believe I am going to cop out somewhat by introducing someone else's words. And very beautiful words they are. Enjoy.
What Is Man?
What is he?
-A man, of course.
Yes, but what does he do?
-He lives and is a man.
Oh quite! But he must work. He must have a job of some sort
-Why?
Because obviously he’s not one of the leisured classes.
-I don’t know. He has lots of leisure. And he makes quite beautiful chairs.
There you are then! He’s a cabinet maker.
-No, no
Anyhow a carpenter and a joiner.
-Not at all.
But you said so
-What did I say?
That he made chairs and was a joiner and carpenter
-I said he made chairs, but I did not say he was a carpenter.
All right then he is just an amateur?
-Perhaps! would you say a thrush was a professional flautist, or just an amateur?
I’d say it was just a bird
-And I say he is just a man.

Thrush woodcut by Indriani Widiastuti
DH Lawrence
P.S. My blogging virginity is well and truly lost forever.